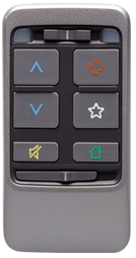
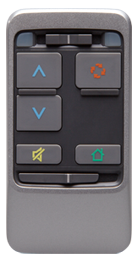
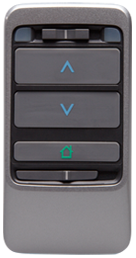

Wireless Accessories selects and configures additional devices to adjust volume, memory, etc. using a remote control or stream audio from a mobile phone, MP3 player, computer, television, DVD player, etc. directly to wireless hearing aids using Specsavers' IRIS™ technology. Specsavers offers three accessories that can be synced with the wireless hearing aids.
SurfLink Remote Control - Adjusts volume, memory, mutes/unmutes the hearing aids, and starts/stops audio streaming from the SurfLink Media remotely.
SurfLink Mobile - Adjusts the hearing aids' volume, memory, etc. and streams audio from the SurfLink Mobile's directional or omni-directional microphones, a Bluetooth® enabled device such as a mobile phone or entertainment device (e.g., MP3 player or computer), or device plugged into the SurfLink Mobile's micro USB port.
SurfLink Media - Streams audio from a television, DVD player, or other sound source automatically or remotely using either the SurfLink Remote Control or SurfLink Mobile.
Only one remote device can be paired with the hearing aids at a time, therefore, either the SurfLink Remote Control or SurfLink Mobile can be enabled. A Favorite button function can be configured for the SurfLink Remote Control or SurfLink Mobile to stop/start audio streaming, control noise (iQ Boost, which initiates a more aggressive noise reduction setting and forced directional action in the current memory, if supported), etc. Audio streaming in specific memories can be enabled/disabled for the SurfLink Media and if a Best Fit is performed on both hearing aids, all applicable memories are automatically enabled. Per memory microphone settings while streaming can also be configured for the SurfLink Mobile and/or SurfLink Media.
The SurfLink Remote Control is available in three levels: Advanced, Intermediate, and Basic. If the patient desires a different level in the future, the faceplate can be easily changed with the removal tool. See Removing the Faceplate for instructions on switching the SurfLink Remote faceplate.
Advanced - Adjusts volume, memory, mutes/unmutes the hearing aids, returns the hearing aids to the Home setting (memory 1 and their programmed volume control setting), and configures the Favorite button to perform a specific function. This level is the default and is best suited for use with the SurfLink Media.
Intermediate - Adjusts volume, memory, mutes/unmutes the hearing aids, and returns the hearing aids to the Home setting (memory 1 and their programmed volume control setting).
Basic - Adjusts volume and returns the hearing aids to the Home setting (their programmed volume control setting).
Below is a picture of the three SurfLink Remote Controls and descriptions of the buttons. See the SurfLink Advanced Remote Control Operations Manual, SurfLink Intermediate Remote Control Operations Manual, or SurfLink Basic Remote Control Operations Manual for instructions on operating the specific SurfLink Remote Control or view instructional videos via Instructional Videos for the Professional. For assistance with solving SurfLink Remote Control issues, see Troubleshooting.


Advanced Intermediate Basic
| SurfLink Remote Control Button | Description |
|
Selects if the left, both, or right hearing aid will be adjusted. To adjust the left hearing aid only, slide the switch to the left and the blue light illuminates. To adjust both hearing aids, slide the switch to the middle (as shown). To adjust the right hearing aid only, slide the switch to the right and the red light illuminates. |
|
Increases the volume on the hearing aids and/or SurfLink Media. |
|
Decreases the volume on the hearing aids and/or SurfLink Media. |
|
Mutes and unmutes the hearing aids. Pressing any other button will also unmute the hearing aids and perform the function of the button. This feature is not available on the Basic Remote Control. |
|
Cycles through the available memories. This feature is not available on the Basic Remote Control. |
|
Performs the programmed function (e.g., stop/start audio streaming, control noise, etc.). If Stop/Start Audio Stream is selected and SurfLink Media is also enabled with Automatic Streaming selected, this button stops audio streaming. Pressing the button again restarts audio streaming. If Stop/Start Audio Stream is selected and SurfLink Media is also enabled with Remote Control Streaming selected, this button starts audio streaming. Pressing the button again stops audio streaming. This feature is only available on the Advanced Remote Control. |
|
Returns the hearing aids to memory 1 at their power-on volume level. |
|
Locks and unlocks the remote control. To lock the remote control to prevent adjustments from occurring if a button is pressed inadvertently, slide the switch to the right to expose orange. To unlock the remote control, slide the switch to the left (as shown). |
In addition, the SurfLink Remote Control can be set to operate in two different modes: Multicast and Broadcast. Multicast mode can control up to four hearing aids that were synced with the remote control. Broadcast mode can control any hearing aids that were remote control enabled but have not been synced with a specific remote control. All SurfLink Remote Controls default to Multicast mode when shipped and if the hearing aids and remote control were ordered together, they're automatically synced together. The mode can be changed at any time by removing the faceplate and moving the switch to the desired mode. Position 1 represents Multicast and position ∞ represents Broadcast.
The operating range from the remote control to the hearing aids should be within 1.07 meters or 42 inches. This range allows the patient to operate the remote control from pockets, purses, etc.
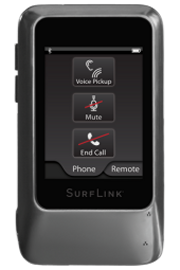
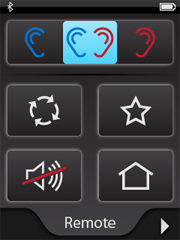
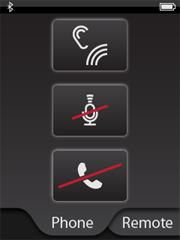
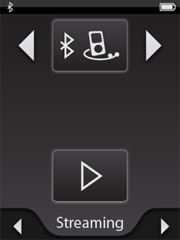
The SurfLink Mobile contains four main screens: Remote, Phone, Streaming, and Settings. The Remote screen adjusts the hearing aids once they've been synced to the SurfLink Mobile. The Phone screen controls outgoing and incoming calls once a cell phone has been paired with the SurfLink Mobile. The Streaming screen starts/stops audio streaming from the SurfLink Mobile's directional or omni-directional microphones, Bluetooth devices once they've been paired with the SurfLink Mobile, or a device plugged into the SurfLink Mobile's micro USB port. The Settings screen syncs Bluetooth devices and hearing aids to the SurfLink Mobile, adjusts the display brightness, selects the language, sets screen defaults, and displays device information. In addition, the SurfLink Mobile Remote screen can be configured for the same three levels as the SurfLink Remote Control: Advanced, Intermediate, and Basic. If the patient desires a different level in the future, the remote option can be easily changed in the Settings>Tools screen.
Below is a picture of the SurfLink Mobile, images of the four screens, and descriptions of the buttons. When a button is pressed, it illuminates blue. See the SurfLink Mobile Operations Manual for instructions on setting up, syncing, and operating the SurfLink Mobile or view instructional videos via http://www.starkeypro.com/surflinkmobile/.

| SurfLink Mobile | Description | |
|
Indicates the Bluetooth antenna is On. |
|
|
Indicates the battery strength visually and numerically. Full battery represents 100% battery life, half battery represents approximately 50%, red represents less than 20%, and green indicates the battery is charging. |
|
|
Increases (with press of top button) and decreases (with press of bottom button) the volume on the hearing aids or streaming device based on the screen accessed. Volume changes made with the Remote screen in view adjust the volume of the hearing aids. Whenever a streaming session is active, volume changes adjust the streamed audio volume level. SurfLink Mobile remembers the last volume level used for each paired streaming device and automatically defaults to that volume the next time that device is streamed. These physical buttons are located on the left side of the SurfLink Mobile. |
|
|
Navigates between the main screens. |
|
| Remote Screen (Default) | ||
|
Selects if the left, both, or right hearing
aid will be adjusted. To adjust the left hearing aid only, press |
|
|
Cycles through the programmed memories. |
|
|
Performs the programmed Favorite function (e.g., stop/start audio streaming, control noise, etc.). |
|
|
Mutes and unmutes the hearing aids. |
|
|
Returns the hearing aids to memory 1 at the programmed volume level. |
|
| Phone Screen (displays when an outgoing call is made from the paired mobile phone or an incoming call is answered) | ||
|
Just Talk mode picks up the patient's voice via the hearing aid's microphone for transmission to the person on the other end of the phone call. This option is recommended in quiet environments. When selected, this button changes to SurfLink Mic mode, allowing the patient toggle between the two voice pickup modes. SurfLink Mobile remembers the last microphone used and automatically defaults to that microphone the next time a phone call is answered. |
|
|
SurfLink Mic mode picks up the patient's voice via the SurfLink Mobile's microphone for transmission to the person on the other end of the phone call. When selected, this button changes to Just Talk mode (hearing aid microphone), allowing the patient toggle between the two voice pickup modes. SurfLink Mobile remembers the last microphone used and automatically defaults to that microphone the next time a phone call is answered. When using the SurfLink Mic for voice pickup, the SurfLink Mobile should be worn within 12 inches of the patient's mouth for optimal voice pickup. |
|
|
Mutes and unmutes the patient's voice during the phone call. |
|
|
Ends the call on the patient's mobile phone. |
|
| Streaming Screen | ||
|
Focus streams audio from the SurfLink Mobile's directional microphone. Prior to streaming, the patient should point the SurfLink Mobile microphone toward the sounds that he/she wants to hear. It's also important, especially in noisy environments, to move the SurfLink Mobile as close as possible to the sound source. |
|
|
Surround streams audio from the SurfLink Mobile's omni-directional microphone. |
|
|
Wired streams audio from the device plugged into the SurfLink Mobile's micro USB port. This button is only available when a wired input is detected on the SurfLink Mobile micro USB port. |
|
|
Streams audio from a Bluetooth device that's paired with the SurfLink Mobile. This button is only available when the SurfLink Mobile Bluetooth is On, at least one Bluetooth entertainment device has been paired with SurfLink Mobile and that entertainment device is On and within range of SurfLink Mobile. If multiple paired Bluetooth devices are available, the Bluetooth Streaming Input button will page through a list of available paired Bluetooth devices. |
|
|
Starts streaming the audio from the selected input. |
|
|
Stops streaming the audio from the selected input. |
|
| Settings Screen | ||
|
Turns the Bluetooth antenna On/Off, pairs SurfLink Mobile (with up to 7 Bluetooth devices) for audio streaming, and manages paired Bluetooth entertainment devices. |
|
|
Syncs/unsyncs hearing aids with/from the SurfLink Mobile. |
|
|
Adjusts the display brightness, selects the language, sets screen defaults, and displays device information. |
|
Only the hearing aids (one left and one right) that were synced with the device can be controlled by the SurfLink Mobile. The SurfLink Mobile should be kept within 1-2 meters or 3-6 feet of the hearing aids during cell phone streaming and within 4-5 meters or 12-15 feet during audio streaming from the Streaming screen. If the patient walks out of range and loses the audio stream, he/she must return within range, press Stop to end the current stream, and then press Play to reconnect the SurkfLink Mobile and hearing aids. The SurfLink Mobile should be kept within 10 meters or 30 feet of the Bluetooth device during audio streaming. If either device is out of range for more than 5 minutes, they may have to be reconnected. When streaming, all ear-to-ear features are disabled.
The SurfLink Media streams audio from a dedicated audio device (e.g., television, cable box, etc.) or external microphone automatically or remotely using either the SurfLink Remote Control or SurfLink Mobile. If streaming automatically, the hearing aids will accept the audio stream whenever the patient is within range of the SurfLink Media. If streaming manually, the patient must press the Favorite button on either the SurfLink Remote Control or SurfLink Mobile (if they're configured for this function) to control audio streaming. The hearing aids can also be programmed for audio streaming only or audio streaming plus microphone to allow environmental sounds to be heard during audio streaming.
Below is a picture of the SurfLink Media and descriptions of the buttons. See the SurfLink Media Manual for instructions on setting up and operating the SurfLink Media or view instructional videos via Instructional Videos for the Professional. For assistance with solving SurfLink Media issues or to answer frequently asked questions, see Troubleshooting or FAQ's.

| SurfLink Media Control Button | Description |
|
Turns the SurfLink Media On/Off. The power button illuminates blue when the device is on. |
|
Increases and decreases the volume of the device connected to the SurfLink Media. Slide your finger to the right to increase the volume and to the left to decrease the volume. The blue light indicates the volume control position. |
|
Increases and decreases the streaming activation range between the SurfLink Media and the hearing aids. Slide your finger to the right to increase the range and to the left to decrease the range. The blue light indicates the range position. |
The SurfLink Media operates in Broadcast mode, therefore, any wireless hearing aids within range are automatically connected. The operating range from the SurfLink Media to the hearing aids is 1-8 meters or 3-25 feet. This range allows the patient to move freely within the room or possibly leave the room and still receive the audio signal. When streaming, all ear-to-ear features are disabled.
Connect and select the desired wireless hearing aid(s) to configure via Get Started.
Click Quick Connect or Session Connect.
Click Fitting from the Left Navigation Menu.
Click Wireless.
Click Accessories.
| Note: This feature is not available in some manufacturer's software for specific target audiences and locales selected via General Preferences. |
Select accessories.
| Field Name | Description | Details |
| Enable SurfLink Remote Control | Denotes whether or not to enable the SurfLink Remote Control and selects the level. | Only one remote device can be paired with the hearing aids, therefore, if SurfLink Remote Control is selected and SurfLink Mobile was selected previously, it's automatically unchecked. The levels available are Advanced, Intermediate, and Basic. The default is Advanced. |
| Enable SurfLink Mobile | Denotes whether or not to enable the SurfLink Mobile. | Only one remote device can be paired with the hearing aids, therefore, if SurfLink Mobile is selected and SurfLink Remote Control was selected previously, it's automatically unchecked. This device is available for Advance 26 and Advance 26 Micro products and only available for Advance 24 products if the hearing aid's firmware version is 2.6 or greater. |
| Enable SurfLink Media | Denotes whether or not to enable the SurfLink Media and selects the streaming option. | The options available are Automatic Streaming and Remote Control Streaming. If Remote Control Streaming is selected, either the Advanced SurfLink Remote Control or SurfLink Mobile is required and Stop/Start Audio Stream must be selected for the Favorite button. However, if Enable SurfLink Media was activated previously and streaming is changed from Automatic to Remote Control, the Advanced SurfLink Remote Control or SurfLink Mobile will not be required. |
Configure the selected accessories.
| Field Name | Description | Details |
| Accessory Syncing/Un-Syncing | Identifies the address number on the SurfLink Remote Control to sync with the hearing aids or unsync's hearing aids from the remote device. | 4 Hexadecimal (0-9 and/or A-F)
Enter only the 4 character address after 3E on the SurfLink Remote Control found on the back of the device if configuring Multicast mode and click Sync. If configuring the SurfLink Remote Control for Broadcast mode, leave this field blank. This field is only available if Enable SurfLink Remote Control was selected. Once synced, the address and right and/or left ear images display to indicate which hearing aids are paired with the remote device. To unsync hearing aids from the SurfLink Remote Control, click Un-Sync. Hearing aids are synced/unsynced with/from the SurfLink Mobile via the SurfLink Mobile's Settings>Hearing Devices screen. Before syncing/unsyncing the hearing aids with/from the SurfLink Mobile, end the wireless fitting session first by clicking  . . |
| Favorite Button Configuration | Selects the function that the Favorite button will initiate. | This field is only available if Enable SurfLink Remote Control (Advanced) or Enable SurfLink Mobile was selected. The options available are based on the hearing aid's firmware version (2.6 or greater) and the products connected. The options are None, Stop/Start Audio Stream, iQ Boost (Advance i726, i626, i526 and Advance 26 Micro [20 dB reduction at >75 dB input], Advance 724, 624, and 524 [20 dB reduction at >80 dB input] only), Jump to Memory 4 (memory 4 must be enabled), and Initiate Self Check (Advance 724, 624, and 524 only and User-Initiated Self Check must be selected for both aids via Self Check and both aids must have a valid baseline). The default is Stop/Start Audio Stream. |
| SurfLink Media Streaming Enabled** | Denotes whether or not to enable audio streaming in specific memories. | These checkboxes are only available if Automatic Streaming is selected for the SurfLink Media. This feature is not applicable for Disabled or Telephone memories (an asterisk displays after the memory label) or streaming via SurfLink Mobile (streaming initiates in all memories regardless if the memory is enabled/disabled). The environment selected for each memory displays in a tool tip by pointing to Memory 1, Memory 2, etc. If selected for a specific memory, audio streaming will initiate when the hearing aids are in the specific memory. |
| Hearing Aid Microphone Setting While Streaming | Selects if the hearing aids' microphone should turn off or on during audio streaming in specific memories and if so, how much attenuation should be applied. | These drop down lists are only available if Enable SurfLink Mobile and/or Enable SurfLink Media is selected. This feature is not applicable for Disabled or Telephone memories (an asterisk displays after the memory label [SurfLink Media selected only]). The environment selected for each memory displays in a tool tip by pointing to Memory 1, Memory 2, etc. If only the SurfLink Mobile is selected or both the SurfLink Mobile and SurfLink Media are selected, Telephone memories are enabled, however, the microphone setting is only applied to the SurfLink Mobile. The options available are Mic On, Mic On: -3 dB, Mic On: -6 dB, Mic On: -9 dB, and Mic Off. The default is Mic On: -6 dB. If a memory environment is changed to a different memory environment, a Disabled memory is enabled, or a Best Fit is performed on a specific memory or all memories, the microphone setting for all applicable memories will automatically be reset to Mic On: -6 dB. |
| Note: If a cell phone is paired with the SurfLink Mobile, the warble tone level can be adjusted within Inspire via Indicators. |