
Fine Tuning makes discrete, frequency-specific adjustments to Channel, Maximum Output, and User Volume. Channel changes the specific gain and compression settings, Maximum Output modifies the maximum output, and User Volume controls the amount of reserve gain available. Adjustments can be made to each individual channel, to groups of channels labeled low frequencies, mid frequencies or high frequencies, or to all channels simultaneously.
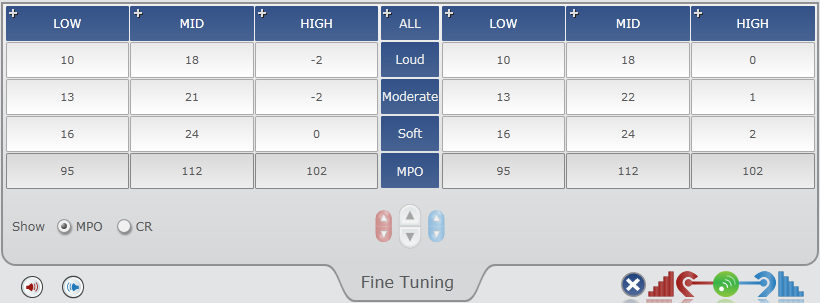
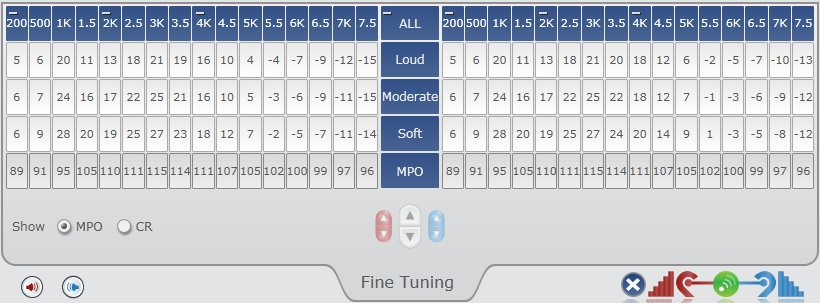
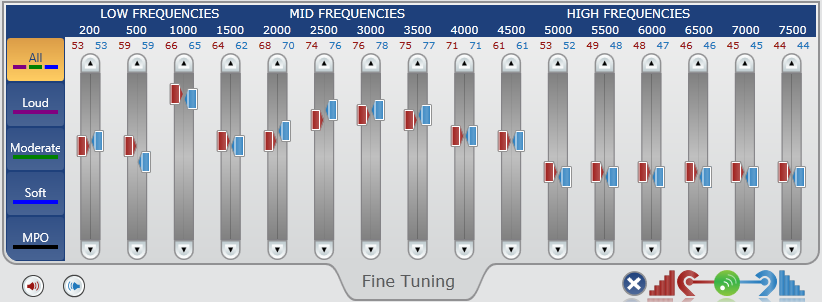
Adjustments can be made via three views. The Table View displays current numerical gain values per ear side for specific frequency ranges or individual channels depending on the state of each frequency range control (expanded or collapsed). Adjustments to the selected cells can be made via up and down arrows. The option to display either Max Output (MPO) or Compression Ratio (CR) rows and associated values can be selected. The Slider View displays the average numerical gain values per ear side for each channel. Adjustments per input range (All, Loud, Moderate, or Soft) or maximum output (MPO) can be made via slider bars. The Volume Control displays the step size, reserve gain, and/or range and provides access to User Control Configuration. In addition, all adjustments can be made graphically.
Connect and select the desired hearing aid(s) to fine tune via Get Started.
Click Quick Connect or Session Connect.
| Note: If Advanced is selected for the default fitting view via General Preferences, the Fine Tuning screen automatically displays. Continue at step 5. |
Click Fitting from the Left Navigation Menu.
Click Fine Tuning.
Make adjustments via Table View, Slider View, or Volume Control screens.
| Note: The Table View automatically defaults. If the Slider View was last selected, this view automatically defaults the next time Fine Tuning is accessed for similar products in a new session. |
Click Table View from the Left Navigation Menu.

| Note: Only the average numerical gain values per frequency range displays. |
Click the + for the specific frequency range (Low, Mid, or High) to display the numerical gain values for all available channels within the frequency range or click the + for All to display the numerical gain values for all channels.

| Note: The numerical table values always reference 2cc Coupler Gain, which may differ from the graphical view currently selected. The numerical value for the current graphical view and 2cc Coupler Gain displays in a tool tip by pointing to any black oval point on the graphical response curves. |
| Tip: Click the - for the specific frequency range (Low, Mid, or High) or All to hide the numerical values. |
Click CR to hide maximum output and display Compression Ratio rows between inputs and their associated values per available frequency range or individual channels if desired.
| Note: Compression Ratio can be adjusted indirectly by modifying the gain adjustments for loud, moderate, and soft inputs. Independent Speech Optimization allows for exclusive CR adjustments between 1.0 and 3.0. The shaded region on the response graph displays the independent adjustment area (CR between 1.0 and 3.0). If adjusting outside the shaded region, all curves are adjusted (CR greater than 3.0). |
| Tip: Click MPO to hide Compression Ratio rows and redisplay Maximum Output. |
Click on the specific memory to adjust if applicable or
click  to adjust all memories
simultaneously.
Inspire automatically defaults to a binaural
![]() view if applicable.
To adjust only the right or left hearing aid, click
view if applicable.
To adjust only the right or left hearing aid, click  or
or  .
.
Click on the frequency/output or group of frequencies/inputs/outputs to adjust.
| Tip: To select a sequential group of frequencies, click on the beginning column header or frequency cell, press and hold Shift and click on the ending column header or frequency cell and all columns or frequencies between the two clicks will be selected, or press and hold the left mouse button and drag to the left or right until the desired group of frequencies are selected and then release the left mouse button. To select a non-sequential group of frequencies within a row, press and hold Ctrl and click on the desired frequencies. To select a specific frequency range, click the column header (Low, Mid, or High) or click All to select all frequencies and inputs. To select a specific input range or maximum output, click the row header (Loud, Moderate, Soft, or MPO). Selected frequencies are represented in orange on both the fitting graph and table. |
Click the up or down arrow keys to increase or decrease the gain or output per ear side or binaurally.
| Tip: Adjustments can also be made graphically by dragging and dropping points on the frequency response curve. If Display Max Output Line on all SPL Graphs is not selected via General Preferences, MPO cannot be adjusted graphically. |
Click Slider View from the Left Navigation Menu.

Click on the specific memory to adjust if applicable or
click  to adjust all memories
simultaneously.
Inspire automatically defaults to a binaural
![]() view if applicable.
To adjust only the right or left hearing aid, click
view if applicable.
To adjust only the right or left hearing aid, click  or
or  .
.
Click on the specific input range (All, Loud, Moderate, or Soft) or maximum output (MPO) to adjust.
| Note: The average numerical gain values per ear side for each frequency displays based on the input/output selected. Selected inputs/output are represented in bold (purple, green, blue, or black) on the fitting graph and orange to the left of the sliders. |
Drag the slider bars 
 to increase or decrease the gain
or output per ear side or click the up or down arrow keys to increase
or decrease binaurally.
| Note: The gray area on the slider bars represents the range of possible adjustment and the white area represents available reserve gain. When the white area is located at the bottom of the slider, that particular band or channel has no remaining reserve gain. |
| Tip: Adjustments can also be made graphically by dragging and dropping points on the frequency response curve. If Display Max Output Line on all SPL Graphs is not selected via General Preferences, MPO cannot be adjusted graphically. |
Click Volume Control from the Left Navigation Menu.
Click User Control
Configuration  to change any volume
control configurations if applicable.
Inspire automatically defaults to a binaural
![]() view if applicable.
To adjust only the right or left hearing aid, click
view if applicable.
To adjust only the right or left hearing aid, click  or
or  .
.
Select the desired step size, reserve gain, and/or range from the drop down lists.
| Note: Volume control adjustments can only be made to Memory 1. The options available for step size are 2 and 4 dB. The options available for reserve gain are based on the step size selected. If step size 2 dB is selected, the reserve gain options are 0, 2, 4, and 6 dB. If step size 4 dB is selected, the reserve gain options are 0, 4, 8, and 12 dB. The options available for range are 8, 12, 20, and 40 dB. This number represents the total volume range. By changing the slider on the right, the amount of available gain above and below use gain is adjusted. If the hearing aid contains a continuous digital VC, only step size 2 dB is available and the reserve gain options are 0, 2, 4, 6, and 8 dB. If the hearing aid contains a standard analog VC, step size is not applicable and the reserve gain is always 8 dB. |
Click the up or down arrow keys to increase or decrease the reserve gain per ear side, if available.
| Note: These controls are only available on select volume control devices. User volume control for touch tone phones (T²) can be adjusted via this screen. |